
Quagga gibt es als Paket für Alpine Linux. Es ist daher recht schnell möglich, einen Router aufzusetzen. Die Installation erfolgt per apk.
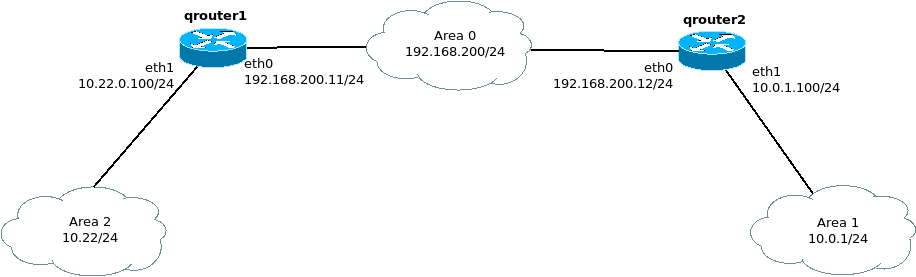
Ich gehe davon aus, dass Alpine lauffähig installiert ist und einen Weg ins Internet hat. Folgende Topologie soll testweise (d. h. diese Topologie ist offen wie ein Scheunentor) mittels OSPF konfiguriert werden:
Schritt 1 - Installation von Quagga
1
2
qrouter1:~# apk add quagga quagga-doc
qrouter2:~# apk add quagga quagga-doc
Schritt 2 - Konfigurationen erstellen
1
2
3
4
qrouter1:/etc/network# cp /usr/share/doc/quagga/zebra.conf.sample /etc/quagga/zebra.conf
qrouter2:/etc/network# cp /usr/share/doc/quagga/zebra.conf.sample /etc/quagga/zebra.conf
qrouter1:~# cp /usr/share/doc/quagga/ospfd.conf.sample /etc/quagga/ospfd.conf
qrouter2:~# cp /usr/share/doc/quagga/ospfd.conf.sample /etc/quagga/ospfd.conf
Schritt 3 - Start der Quaggaprozesse und Einbindung ins Runlevel
1
2
3
4
5
6
7
8
9
10
11
12
qrouter1:/etc/network# /etc/init.d/zebra start
qrouter2:/etc/network# /etc/init.d/zebra start

qrouter1:~# rc-update add zebra
 * service zebra added to runlevel default
qrouter1:~# rc-update add ospfd
 * service ospfd added to runlevel default

qrouter2:~# rc-update add zebra
 * service zebra added to runlevel default
qrouter2:~# rc-update add ospfd
 * service ospfd added to runlevel default
Damit ist der Router funktionsfähig. Kleine Bemerkung am Rande: sollte jemand auf die Idee kommen, das System mit ufw abzusichern: ich habe es nicht hinbekommen, dass zwischen beiden Systemen OSPF Multicastpakte erlaubt werden. OSPF benötigt jedoch zwingend Multicast. Daher sollte eine “klassische” Absicherung im Router selber erfolgen, an Hand von Accesslists.
Schritt 4 - Router konfigurieren
Die CLI von Quagga ähnelt sehr stark Cisco’s IOS. Mittels vtysh vom jeweiligen Router verbindet man sich mit der Router CLI.
1
2
3
4
5
6
7
8
9
10
11
12
13
14
15
16
17
18
19
20
21
22
23
24
25
26
27
28
29
30
31
qrouter1# conf t
qrouter1(config)# service password-encryption
qrouter1(config)# enable password password
qrouter1(config)# password password
qrouter1(config)# router ospf
qrouter1(config-router)# log-adjacency-changes
qrouter1(config-router)# router-id 10.10.10.1
qrouter1(config-router)# passive-interface default
qrouter1(config-router)# network 10.22.0.0/24 area 0.0.0.2
qrouter1(config-router)# network 192.168.200.0/24 area 0.0.0.0
qrouter1(config-router)# no passive-interface eth0
qrouter1(config-router)# exit
qrouter1(config)# exit
qrouter1# wr me


qrouter2# conf t
qrouter2(config)# service password-encryption
qrouter2(config)# enable password password
qrouter2(config)# password password
qrouter2(config)# router ospf
qrouter2(config-router)# log-adjacency-changes
qrouter2(config-router)# router-id 10.10.10.2
qrouter2(config-router)# passive-interface default
qrouter2(config-router)# network 10.0.1.0/24 area 0.0.0.1
qrouter2(config-router)# network 192.168.200.0/24 area 0.0.0.0
qrouter2(config-router)# no passive-interface eth0
qrouter2(config-router)# exit
qrouter2(config)# exit
qrouter2# wr me
Damit ist eine minimalistische Basiskonfiguration erstellt, beide Router sollten ihre Nachbarschaft erkennen und entsprechende OSPF Adajancies bilden:
1
2
3
4
qrouter2# sh ip ospf neighbor

Neighbor ID     Pri State           Dead Time Address         Interface            RXmtL RqstL DBsmL
10.10.10.1        1 Full/Backup       34.928s 192.168.200.11  eth0:192.168.200.12      0     0     0
1
2
3
4
qrouter1# sh ip ospf neighbor
Neighbor ID Pri State Dead Time Address Interface RXmtL RqstL DBsmL
10.10.10.2 1 Full/DR 30.660s 192.168.200.12 eth0:192.168.200.11 0 0 0
In diesem Beispiel interessiert es nicht, wer DR und BDR wird, dies kann mittels Router-ID oder ip ospf priority per Interface eingestellt werden. Die Syntax ist der vom IOS sehr ähnlich.
Die Routingtabelle sollte sich langsam aufgebaut haben:
1
2
3
4
5
6
7
8
9
10
11
12
13
14
15
16
17
qrouter1# sh ip route ospf
Codes: K - kernel route, C - connected, S - static, R - RIP,
       O - OSPF, I - IS-IS, B - BGP, P - PIM, A - Babel, N - NHRP,
       > - selected route, * - FIB route

O>* 10.0.1.0/24 [110/20] via 192.168.200.12, eth0, 00:01:06
O   10.22.0.0/24 [110/10] is directly connected, eth1, 00:02:39
O   192.168.200.0/24 [110/10] is directly connected, eth0, 00:01:16

qrouter2# sh ip route ospf
Codes: K - kernel route, C - connected, S - static, R - RIP,
       O - OSPF, I - IS-IS, B - BGP, P - PIM, A - Babel, N - NHRP,
       > - selected route, * - FIB route

O   10.0.1.0/24 [110/10] is directly connected, eth1, 00:13:06
O>* 10.22.0.0/24 [110/20] via 192.168.200.11, eth0, 00:01:15
O   192.168.200.0/24 [110/10] is directly connected, eth0, 00:12:55
Routinginformationen werden getauscht, damit “funktionieren” beide Systeme.
Es können jetzt noch sicherheitsrelevante Merkmale konfiguriert werden, wie line vty ACLs, OSPF-Authentification etc. Auch hier entspricht die Syntax der von IOS.
Eventuell ist Quagga für den Einen oder Anderen eine Alternative zu teuren Routerlösungen.