
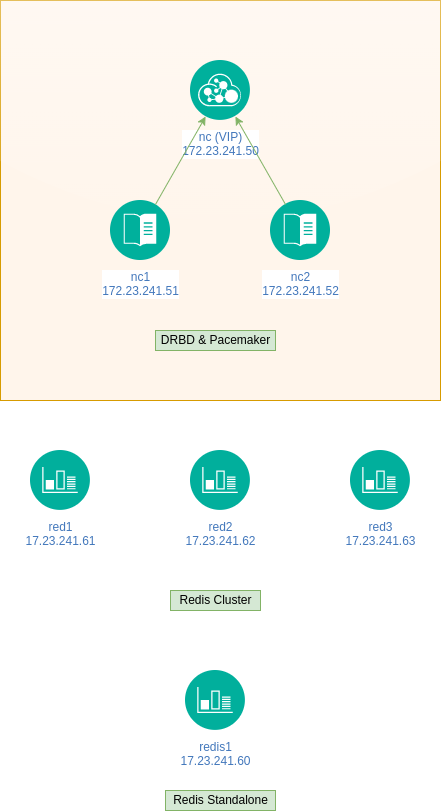
Im Beispiel werden zwei Webserver eingerichtet. Die Systeme arbeiten als active/passive Cluster. Als Webserver kommt Apache mit PHP zum Einsatz, installiert unter Oracle Linux 8.6. Die Daten werden über DRBD synchron gehalten, die Dienste werden über Pacemaker gesteuert.
Folgende Topologie wird eingerichtet:
Festplatten einbinden
Die Userdaten liegen auf einer DRBD Partition. Es wird das Verzeichnis /cloudstore erstellt.
Das Device /dev/sda wird per LVM vorbereitet und der Volumegruppe ol hinzugefügt.
1
2
3
4
5
6
fdisk /dev/sda
n p 1 <enter> <enter> t 8e w
pvcreate /dev/sda1
vgextend ol /dev/sda1
lvcreate -n cloud -l +100%FREE ol
mkdir /cloudstore
Dies muss auf beiden Nodes ausgeführt werden.
DRBD installieren
Das Oracle 8 Epel Repo muss aktiviert werden.
1
2
dnf install oracle-epel-release-el8
dnf install drbd drbd-bash-completion
DRBD einrichten
Folgende Dateien werden angepasst.
/etc/drbd.d/global_common.conf
1
2
3
4
5
6
7
8
9
10
11
12
13
14
15
16
17
18
19
20
21
22
23
global {
usage-count no;

}

common {
       handlers {

       }

       startup {
       }

       options {

       }

       disk {
       }

       net {
       }
}
Jetzt wird für den Cloudspeicher das Device /dev/drbd0 eingerichtet.
/etc/drbd.d/cloud.res
1
2
3
4
5
6
7
8
9
10
11
12
13
14
15
16
17
18
19
20
21
22
23
24
25
26
27
28
resource cloud {
        protocol C;
        device /dev/drbd0;
        disk /dev/ol/cloud;
        meta-disk internal;
        handlers {
                split-brain "/usr/lib/drbd/notify-split-brain.sh root";
        }

        net {
        allow-two-primaries;
        cram-hmac-alg sha1;
        shared-secret "xxx";
        }

        syncer {
        rate 100M;
        verify-alg sha1;
        }

        on nc1.decon230.org {
        address 172.23.245.51:7789;
        }

        on nc2.decon230.org {
        address 172.23.245.52:7789;
        }
}
Wichtig: DNS muss funktionieren, sollte dies nicht der Fall sein, muss die /etc/hosts angepasst werden. Die DRBD-Nodes müssen mit der Bezeichnung von uname -a eingetragen werden, andernfalls werden keine DRBD-Devices erstellt.
1
2
3
4
5
drbdadm create-md cloud
initializing activity log
initializing bitmap (320 KB) to all zero
Writing meta data...
New drbd meta data block successfully created.
Dies wird auf beiden Nodes durchgeführt.
Auf der primary & secondary Node wird folgendes ausgeführt:
1
2
systemctl start drbd
drbdadm up cloud
Auf der primary Node
1
drbdadm primary cloud --force
ausführen.
Jetzt kann mit cat /proc/drbd der Status der Synchronisation geprüft werden.
1
2
3
4
5
6
version: 8.4.11 (api:1/proto:86-101)
srcversion: FC3433D849E3B88C1E7B55C
0: cs:SyncSource ro:Primary/Secondary ds:UpToDate/Inconsistent C r-----
ns:1312392 nr:0 dw:0 dr:1315928 al:8 bm:0 lo:0 pe:1 ua:2 ap:0 ep:1 wo:f oos:9169564
[=>..................] sync ed: 12.6% (8952/10232)M
finish: 0:04:06 speed: 37,168 (37,476) K/sec
Alternativ: watch -n1 'cat /proc/drbd'.
Ein drbdmadm status muss folgendes ausgeben:
1
2
3
4
cloud role:Primary
disk:UpToDate
peer role:Secondary
replication:Established peer-disk:UpToDate
Jetzt kann /dev/drbd0 formatiert werden.
1
2
mkfs -t ext4 /dev/drbd0
mount /dev/drbd0 /cloudstore/
Jetzt können Daten auf das Device kopiert werden. Anschließend wird das Device ausgehangen, drbdadm secondary cloud auf Node 1 ausgeführt, drbdadm primary cloud; mount /dev/drbd0 /cloudstore auf Node 2 ausführen. Die Daten sollten jetzt auf Node 2 zu sehen sein.
Die Schritte werden jetzt für die Inhalte des Webservers wiederholt, für das Device /dev/drbd1. Dieses basiert auf /dev/sdb, welches als LVM www erstellt wird.
/etc/drbd.d/web.res
1
2
3
4
5
6
7
8
9
10
11
12
13
14
15
16
17
18
19
20
21
22
23
24
25
26
27
28
resource web {
        protocol C;
        device /dev/drbd1;
        disk /dev/ol/www;
        meta-disk internal;
        handlers {
                split-brain "/usr/lib/drbd/notify-split-brain.sh root";
        }

        net {
        allow-two-primaries;
        cram-hmac-alg sha1;
        shared-secret "xxx";
        }

        syncer {
        rate 100M;
        verify-alg sha1;
        }

        on nc1.decon230.org {
        address 172.23.245.51:7790;
        }

        on nc2.decon230.org {
        address 172.23.245.52:7790;
        }
}
Cluster konfigurieren
Damit DRBD einen automatischen Failover durchführt, wird Pacemaker als Clustersoftware installiert.
Installation & Aktivierung des Clusters
1
2
3
4
5
6
7
8
9
dnf install pacemaker pcs corosync drbd-pacemaker

systemctl enable --now pcsd.service

usermod -s /bin/bash hacluster

mkdir /home/hacluster

passwd hacluster
Jetzt kann der Cluster initialisiert werden, die Schritte müssen nur auf einem Server ausgeführt werden.
1
2
3
4
5
6
7
8
9
10
11
12
13
14
15
16
17
18
19
20
21
22
23
24
25
26
27
28
29
30
31
32
33
34
35
36
37
38
[root@nc1 ~]# pcs host auth nc1
Username: hacluster
Password:
nc1: Authorized

[root@nc1 ~]# pcs host auth nc2
Username: hacluster
Password:
nc2: Authorized

[root@nc1 ~]# pcs cluster setup cloud nc1 addr=172.23.241.51 nc2 addr=172.23.241.52

Destroying cluster on hosts: 'nc1', 'nc2'...
nc1: Successfully destroyed cluster
nc2: Successfully destroyed cluster
Requesting remove 'pcsd settings' from 'nc1', 'nc2'
nc1: successful removal of the file 'pcsd settings'
nc2: successful removal of the file 'pcsd settings'
Sending 'corosync authkey', 'pacemaker authkey' to 'nc1', 'nc2'
nc1: successful distribution of the file 'corosync authkey'
nc1: successful distribution of the file 'pacemaker authkey'
nc2: successful distribution of the file 'corosync authkey'
nc2: successful distribution of the file 'pacemaker authkey'
Sending 'corosync.conf' to 'nc1', 'nc2'
nc1: successful distribution of the file 'corosync.conf'
nc2: successful distribution of the file 'corosync.conf'
Cluster has been successfully set up.

[root@nc1 ~]# pcs cluster start --all
nc1: Starting Cluster...
nc2: Starting Cluster...

[root@nc1 ~]# pcs cluster enable --all
nc1: Cluster Enabled
nc2: Cluster Enabled

pcs property set stonith-enabled=false
pcs property set no-quorum-policy=ignore
Damit ist der Clusterdienst eingerichtet.
1
2
3
4
5
6
7
8
9
10
11
12
13
14
15
16
17
18
19
20
[root@nc1 ~]# pcs status
Cluster name: cloud
Cluster Summary:
* Stack: corosync
* Current DC: nc2 (version 2.1.2-4.0.1.el8_6.2-ada5c3b36e2) - partition with quorum
* Last updated: Wed Jul 13 12:08:29 2022
* Last change: Wed Jul 13 12:06:55 2022 by root via cibadmin on nc1
* 2 nodes configured
* 0 resource instances configured

Node List:
* Online: [ nc1 nc2 ]

Full List of Resources:
* No resources

Daemon Status:
corosync: active/enabled
pacemaker: active/enabled
pcsd: active/enabled
Services einrichten
virtuelle IP
Die Services werden über die IP 172.23.241.50 erreichbar gemacht.
1
2
3
4
5
[root@nc1 ~]# pcs resource create VIP ocf:heartbeat:IPaddr2 ip=172.23.241.50 \
 cidr_netmask=24 op monitor interval=30s

[root@nc1 ~]# pcs resource
* VIP (ocf::heartbeat:IPaddr2): Started nc1
DRBD
Beim Dateisystem müssen Abhängigkeiten und Startreihenfolgen beachtet werden. Da diese Konfiguration komplex ist, wird sie im ersten Schritt in eine Konfigurationsdatei geschrieben, anschließend in den Cluster geladen.
1
2
3
4
5
6
7
8
9
10
11
12
13
14
15
16
17
18
19
20
21
22
23
24
25
26
27
28
29
[root@nc1 ~]# pcs cluster cib cluster.cfg

pcs -f cluster.cfg resource create clouddata ocf:linbit:drbd drbd_resource=cloud \
op monitor interval=30s

pcs -f cluster.cfg resource promotable clouddata clone_clouddata master-max=1 \
 master-node-max=1 clone-max=2 clone-node-max=1 notify=true

pcs -f cluster.cfg resource create fs_clouddata ocf:heartbeat:Filesystem \
device="/dev/drbd0" directory="/cloudstore" fstype="ext4"

pcs -f cluster.cfg constraint colocation add clone_clouddata with VIP INFINITY

pcs -f cluster.cfg constraint order VIP then clone_clouddata

pcs -f cluster.cfg constraint colocation add fs_clouddata with \
clone_clouddata INFINITY

pcs -f cluster.cfg constraint order promote clone_clouddata \
then start fs_clouddata

[root@nc1 ~]# pcs -f cluster.cfg resource status
* VIP (ocf::heartbeat:IPaddr2): Started nc1
* Clone Set: clone_clouddata [clouddata] (promotable):
* Stopped: [ nc1 nc2 ]
* fs_clouddata (ocf::heartbeat:Filesystem): Stopped

[root@nc1 ~]# pcs cluster cib-push cluster.cfg
CIB updated
Jetzt sollte die Partition /cloudstore gemountet sein.
1
2
3
4
5
6
7
8
9
10
11
12
13
14
15
16
17
18
19
20
21
22
23
24
25
26
27
[root@nc1 ~]# mount | grep -i cloud
/dev/drbd0 on /cloudstore type ext4 (rw,relatime)

[root@nc1 ~]# pcs status
Cluster name: cloud
Cluster Summary:
* Stack: corosync
* Current DC: nc1 (version 2.1.2-4.0.1.el8_6.2-ada5c3b36e2) - partition with quorum
* Last updated: Wed Jul 13 13:44:37 2022
* Last change: Wed Jul 13 13:32:35 2022 by root via cibadmin on nc1
* 2 nodes configured
* 4 resource instances configured

Node List:
* Online: [ nc1 nc2 ]

Full List of Resources:
* VIP (ocf::heartbeat:IPaddr2): Started nc1
* Clone Set: clone_clouddata [clouddata] (promotable):
* Masters: [ nc1 ]
* Stopped: [ nc2 ]
* fs_clouddata (ocf::heartbeat:Filesystem): Started nc1

Daemon Status:
corosync: active/enabled
pacemaker: active/enabled
pcsd: active/enabled
Jetzt muss die Partition für den Webserver eingerichtet werden.
1
2
3
4
5
6
7
8
9
10
11
12
13
14
15
16
17
18
19
pcs cluster cib apache.cfg

pcs -f apache.cfg resource create webdata ocf:linbit:drbd drbd_resource=web op monitor interval=30s

pcs -f apache.cfg resource promotable webdata clone_webdata master-ax=1 master-node-max=1 clone-max=2 clone-node-max=1 notify=true

pcs -f apache.cfg resource create fs_webdata ocf:heartbeat:Filesystem device="/dev/drbd1" directory="/var/www" fstype="ext4"

pcs -f apache.cfg constraint colocation add clone_webdata with VIP INFINITY

pcs -f apache.cfg constraint order VIP then clone_webdata

pcs -f apache.cfg constraint colocation add fs_webdata with clone_webdata INFINITY

pcs -f apache.cfg constraint order promote clone_webdata then start fs_webdata

pcs -f apache.cfg resource status

pcs cluster cib-push apache.cfg
Damit ist die Partition /var/www gemountet und einsatzbereit.
1
2
[root@nc1 ~]# mount | grep -i www
/dev/drbd1 on /var/www type ext4 (rw,relatime)
Apache
Für den Webserver muss ebenfalls eine Ressource erstellt werden, vorher muss dieser jedoch erstmal installiert werden.
1
2
3
4
5
dnf install oracle-epel-release-el8 -y
dnf install httpd mod_qos mod_ssl -y
cd /var/www
chown apache:apache /html
chmod 750 /html
Sollte mod_reqtime beim Apache in Verwendung sein, muss dieses Modul deaktiviert werden, andernfalls kommt es zu php_fcgid Fehlern.
1
2
3
4
5
vi /etc/httpd/conf.d/status.conf
<Location /server-status>
    SetHandler server-status
    Require local
</Location>
Jetzt muss die Clusterressource erstellt werden.
1
2
3
4
5
6
7
8
9
10
11
pcs cluster cib httpd.cfg

pcs -f httpd.cfg resource create httpd ocf:heartbeat:apache configfile=/etc/httpd/conf/httpd.conf statusurl=http://127.0.0.1/server-status

pcs -f httpd.cfg constraint colocation add httpd with VIP INFINITY

pcs -f httpd.cfg constraint order fs_webdata then start httpd

pcs -f httpd.cfg constraint order VIP then httpd

pcs cluster cib-push httpd.cfg
Anschließend sollte Apache starten.
1
2
3
4
5
6
7
8
9
10
11
12
13
14
15
16
17
18
19
20
21
22
23
24
25
26
27
28
29
[root@nc1 ~]# pcs status
Cluster name: cloud
Cluster Summary:
* Stack: corosync
* Current DC: nc1 (version 2.1.2-4.0.1.el8_6.2-ada5c3b36e2) - partition with quorum
* Last updated: Wed Jul 13 14:51:47 2022
* Last change: Wed Jul 13 14:50:47 2022 by root via cibadmin on nc1
* 2 nodes configured
* 8 resource instances configured

Node List:
* Online: [ nc1 nc2 ]

Full List of Resources:
* VIP (ocf::heartbeat:IPaddr2): Started nc1
* Clone Set: clone_clouddata [clouddata] (promotable):
* Masters: [ nc1 ]
* Stopped: [ nc2 ]
* fs_clouddata (ocf::heartbeat:Filesystem): Started nc1
* Clone Set: clone_webdata [webdata] (promotable):
* Masters: [ nc1 ]
* Stopped: [ nc2 ]
* fs_webdata (ocf::heartbeat:Filesystem): Started nc1
* httpd (ocf::heartbeat:apache): Started nc1

Daemon Status:
corosync: active/enabled
pacemaker: active/enabled
pcsd: active/enabled
Der Webserverprozess wird somit erst aktiviert, nachdem DRBD /dev/drbd1 nach /var/www gemountet hat. Diese Reihenfolge ist wichtig, anderfalls wird Apache nicht starten.
Durch Pacemaker kann apachectl nicht mehr verwendet werden, daher muss der Prozess mit pcs resource restart httpd gesteuert werden.
PHP
Als Skriptsprache wird PHP 8.0.x verwendet. PHP wird folgendermaßen installiert:
1
2
3
4
5
6
7
8
9
10
11
12
13
14
15
16
17
dnf install https://rpms.remirepo.net/enterprise/remi-release-8.rpm
dnf module reset php -y
dnf module enable php:remi-8.0

dnf install -y php php-cli php-common php-pdo php-fpm php-mbstring php-opcache php-sodium php-xml \
php-mbstring php-intl php-pecl-zip php-pecl-apcu php-gmp php-bcmath php-ldap php-pecl-xmlrpc \
php-process php-soap php-tidy php-pecl-imagick php-mysqlnd php-pear php-fedora-autoloader \
php-pecl-redis5 php-pecl-igbinary php-pecl-msgpack php-pecl-mcrypt php-gd
/etc/php.ini anpassen:
output_buffering = Off
max_execution_time = 300
max_input_time = 300
memory_limit = 4096M
post_max_size = 1024M
upload_max_filesize = 1024M
max_file_uploads = 100
file_uploads = On
Jetzt kann mittels systemctl restart php-fpm der Prozess gestartet werden, der Webserver sollte jetzt PHP-Skripte ausführen. PHP-FPM wird ebenfalls über Pacemaker gesteuert und nach dem Webserverprozess gestartet.
1
2
3
4
5
6
7
8
9
10
11
pcs cluster cib phpfpm.cfg

pcs -f phpfpm.cfg resource create phpfpm systemd:php-fpm

pcs -f phpfpm.cfg constraint colocation add phpfpm with VIP INFINITY

pcs -f phpfpm.cfg constraint order httpd then start phpfpm

pcs -f phpfpm.cfg constraint order VIP then phpfpm

pcs cluster cib-push phpfpm.cfg
Der Clusterstatus sollte jetzt so aussehen:
1
2
3
4
5
6
7
8
9
10
11
12
13
14
15
16
17
18
19
20
21
22
23
24
25
26
27
28
29
30
[root@nc1 ~]# pcs status
Cluster name: cloud
Cluster Summary:
* Stack: corosync
* Current DC: nc1 (version 2.1.2-4.0.1.el8_6.2-ada5c3b36e2) - partition with quorum
* Last updated: Fri Jul 15 17:28:39 2022
* Last change: Fri Jul 15 12:18:49 2022 by root via cibadmin on nc1
* 2 nodes configured
* 9 resource instances configured

Node List:
* Online: [ nc1 nc2 ]

Full List of Resources:
* VIP (ocf::heartbeat:IPaddr2): Started nc1
* Clone Set: clone_clouddata [clouddata] (promotable):
* Masters: [ nc1 ]
* Stopped: [ nc2 ]
* fs_clouddata (ocf::heartbeat:Filesystem): Started nc1
* Clone Set: clone_webdata [webdata] (promotable):
* Masters: [ nc1 ]
* Stopped: [ nc2 ]
* fs_webdata (ocf::heartbeat:Filesystem): Started nc1
* httpd (ocf::heartbeat:apache): Started nc1
* phpfpm (systemd:php-fpm): Started nc1

Daemon Status:
corosync: active/enabled
pacemaker: active/enabled
pcsd: active/enabled
Somit sind Dateisystem, Webserver und Cluster installiert und (grob) konfiguriert.
Nextcloud installieren
Nextcloud herunterladen, entpacken und in die Webserverroot kopieren.
1
2
3
4
5
6
7
wget https://download.nextcloud.com/server/releases/latest.zip
unzip latest.zip
cp -rv nextcloud/* /var/www/html
cd /var/www/html
chown -R apache:apache *
find . -type f -print0 | xargs -0 chmod 640
find . -type d -print0 | xargs -0 chmod 750
Das setzen der Rechte sollte, im Gegensatz zu GFS, schnell erledigt sein.
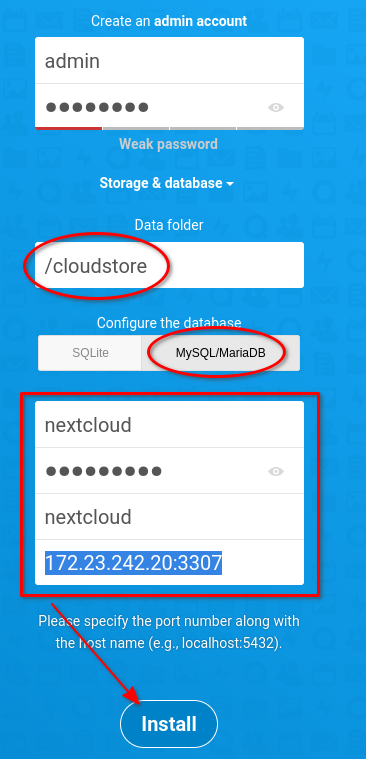
Anschließend wird https://172.23.241.50 aufgerufen (virtuelle IP des Webservercluster) und die Installation gestartet.
Wichtig: bei der Datenbankverbindung wird die virtuelle IP des DB-Loadbalancers eingetragen und Port 3307. Hier ist der HAProxyd gebunden.
Nach der Installation kann sich eingeloggt werden. Es tauchen diverse Fehler im Backend auf.
Nextcloud konfigurieren
Die config.php muss um alle Webnodes erweitert werden.
1
2
3
4
5
6
7
8
9
'trusted_domains' =>

array (

0 => 'nc1.decon230.org',
1 => 'nc2.decon230.org',
2 => 'nc.decon230.org',

),
Ein lokaler Cache muss angeben werden.
1
'memcache.local' => '\OC\Memcache\APCu',
Anschließend kann der Fehler
1
2
3
An unhandled exception has been thrown:
OCP\HintException: [0]: Memcache \OC\Memcache\APCu not available for local cache
(Is the matching PHP module installed and enabled?)
auftreten. Dieser wird mittels vi /etc/php.d/40-apcu.ini und dem aktivieren von apc.enable_cli=1 behoben.
Redis wird als Cache und File Locking Tool eingerichtet. Wer keinen Rediscluster benutzen möchte, verwendet folgende Einstellungen:
1
2
3
4
5
6
7
8
9
10
'filelocking.enabled' => true,
'memcache.locking' => '\OC\Memcache\Redis',
'memcache.distributed' => '\OC\Memcache\Redis',
'redis' => array(
'host' => '172.23.241.60',
'port' => 6379,
'dbindex' => 0,
'password' => 'xxx',
'timeout' => 0.0,
),
Ein Rediscluster wird folgendermaßen konfiguriert:
1
2
3
4
5
6
7
8
9
10
11
12
13
14
15
16
17
'filelocking.enabled' => true,
'memcache.locking' => '\\OC\\Memcache\\Redis',
'memcache.distributed' => '\\OC\\Memcache\\Redis',
'redis.cluster' =>
array (
'seeds' =>
array (
0 => '172.23.241.61:7000',
1 => '172.23.241.62:7000',
2 => '172.23.241.63:7000',
),
'timeout' => '0.0',
'read_timeout' => '0.0',
'password' => 'xxx',
'dbindex' => '0',
'failover_mode' => '\\RedisCluster::FAILOVER_ERROR',
),
Die Datenintegrität wird mittels sudo -u apache php occ maintenance:update:htaccess wiederhergestellt.
Anschließend muss im Webinterface auf “Scan” geklickt werden.
Der Fehler Your web server is not properly set up to resolve "/.well-known/nodeinfo". wird mittels Anpassung im Apachen behoben, ebenfalls der HSTS Fehler.
/etc/httpd/conf.d/nextcloud.conf
1
2
3
4
5
6
Redirect 301 /.well-known/carddav /remote.php/dav
Redirect 301 /.well-known/caldav /remote.php/dav
Redirect 301 /.well-known/webfinger /index.php/.well-known/webfinger
Redirect 301 /.well-known/nodeinfo /index.php/.well-known/nodeinfo

Header always set Strict-Transport-Security "max-age=15552000; includeSubDomains; preload"
Weitere Anpassungen, die nützlich sind:
Telefonregion:
'default_phone_region' => 'DE',
Integritätsprüfung:
'integrity.check.disabled' => true,
Logging:
'loglevel' => 0,
Theme:
'theme' => '',
Apps installieren
Um Collaboration Features zu nutzen, müssen Apps nachinstalliert werden. Entweder geschieht dies über die WebGUI, oder per CLI. Um Deck zu installieren, wird folgender Befehl ausgeführt:
1
2
cd /var/www/html
sudo -u apache php occ app:install deck
Dies kann pro App einzeln ausgeführt werden, oder automatisch per Skript. Apps die sinnvoll sind, sind z. Bsp.
- announcementcenter
- bookmarks
- calendar
- contacts
- files_accesscontrol
- files_automatedtagging
- files_markdown
- notes
- polls
- quota_warning
- tasks
- guests
- files_rightclick
- files_mindmap
- onlyoffice
- deck
- drawio
- checksum
- extract
- files_downloadactivity
- news
- apporder
- twofactor_backupcodes
- twofactor_totp
- collectives
- circles
- groupfolders
Standard Cronjob
Zwecks Verwaltung wird ein Cronjob benötigt. Dieser kann zwar als Webcron eingerichtet werden, wird jedoch nicht empfohlen. Der Cronjob muss in diesem Falle als Apache laufen.
1
crontab -u apache -e
1
*/15 * * * * /usr/bin/php /var/www/html/cron.php
Damit ist die Cloudsoftware installiert und konfiguriert.
Cluster Cronjob
Da es sich hier um einen aktiv/passive Cluster handelt ist das Dateisystem nur auf dem aktiven Clusternode vorhanden. Als Folge wird ein “normaler” Cronjob auf der passive Node ins Leere verlaufen und Fehlermeldungen bringen. Um dies zu verhindern wird der Cronjob ebenfalls per Pacemaker eingerichtet.
1
2
3
mkdir /opt/cron
vi /opt/cron/nccron
*/15 * * * * apache /bin/php -f /var/www/html/cron.php
Jetzt wird Pacemaker konfiguriert
1
2
3
4
5
6
7
8
9
10
11
12
pcs cluster cib cron.cfg

pcs -f cron.cfg resource create cron-nextcloud ocf:heartbeat:symlink \
link=/etc/cron.d/nccron target=/opt/cron/nccron op monitor interval=30s

pcs -f cron.cfg constraint colocation add cron-nextcloud with VIP INFINITY

pcs -f cron.cfg constraint order httpd then start cron-nextcloud

pcs -f cron.cfg constraint order VIP then cron-nextcloud

pcs cluster cib-push cron.cfg
Damit ist auch der Cronjob hochverfügbar.