
Der geneigte Admin kennt die legendären Cisco ACLs. Pro Interfaces kann je eine ACL ein- oder ausgehend aufgelegt werden. Sollte man ein entsprechendes IOS besitzen, kann auch eine sog. zonenbasierte Firewall eingerichtet werden. Diese Konfiugration ist vom Aufwand her nicht geringer, bietet aber den Vorteil, dass Policies nicht mehr pro Interface gesetzt werden, sondern pro Zone. Einer Zone können dann mehrere Interfaces angehören. Aktuell können jedoch nur drei Zonen eingerichtet werden.
Im Beispiel soll examplarisch der Zugriff aus dem LAN auf den Webserver der DMZ (tcp/80, tcp/22, tcp/21, icmp) und auf den Router “Internet” (tcp/22, icmp) eingerichtet werden. Der Router “Internet” soll per http und icmp auf den Webserver zugreifen können, Zugriff auf das LAN soll unterbunden sein. Der Webserver soll pingen können.
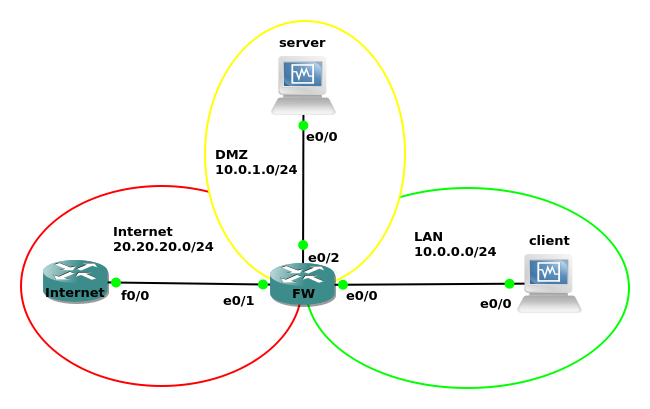
Die Topologie sieht folgendermaßen aus:
Schritt 1 - Festlegen der Zonennamen
1
2
3
FW(config)#zone security LAN
FW(config)#zone security WAN
FW(config)#zone security DMZ
Schritt 2 - Binden der Zonen auf Interfaces
1
2
3
4
5
6
7
8
FW(config)#int e0/0
FW(config-if)#zone-member security LAN

FW(config)#int e0/1
FW(config-if)#zone-member security WAN

FW(config)#int e0/2
FW(config-if)#zone-member security DMZ
Anschließend ist sämtliche Konnektivität unterbrochen.
Schritt 3 - Classmaps erstellen
Hier werden die erlaubten Protokolle eingerichtet. Achtung: es gibt auch das Statement match-all.
1
2
3
4
5
6
7
8
9
10
11
12
13
14
15
16
! Vom WAN in die DMZ
class-map type inspect match-any allowed-traffic-wan-2-dmz
 match protocol icmp
 match protocol http

! Vom LAN in die DMZ
class-map type inspect match-any allowed-traffic-lan-2-dmz
 match protocol ssh
 match protocol ftp
 match protocol http
 match protocol icmp

! Vom LAN nach extern
class-map type inspect match-any allowed-traffic-lan-2-wan
 match protocol icmp
 match protocol ssh
Schritt 4 - Policymaps erstellen
Jetzt müssen die Classmaps in Policymaps eingebunden werden.
1
2
3
4
5
6
7
8
9
10
11
12
13
14
15
16
17
18
19
20
! LAN nach DMZ
policy-map type inspect LAN-2-DMZ-Policy
 class type inspect allowed-traffic-lan-2-dmz
  inspect
 class class-default
  drop

! WAN nach DMZ
policy-map type inspect WAN-2-DMZ-Policy
 class type inspect allowed-traffic-wan-2-dmz
  inspect
 class class-default
  drop

! LAN nach WAN
policy-map type inspect LAN-2-WAN-Policy
 class type inspect allowed-traffic-lan-2-wan
  inspect
 class class-default
  drop
5. Schritt - Zone Pairs einrichten
Jetzt wird die Traffic Richtung und die dazu gehörende Policy eingerichtet.
1
2
3
4
5
6
7
8
zone-pair security LAN-2-WAN source LAN destination WAN
 service-policy type inspect LAN-2-WAN-Policy

zone-pair security LAN-2-DMZ source LAN destination DMZ
 service-policy type inspect LAN-2-DMZ-Policy

zone-pair security WAN-2-DMZ source WAN destination DMZ
 service-policy type inspect WAN-2-DMZ-Policy
Damit ist die Firewall fertig konfiguriert.